Alerts Maintenance

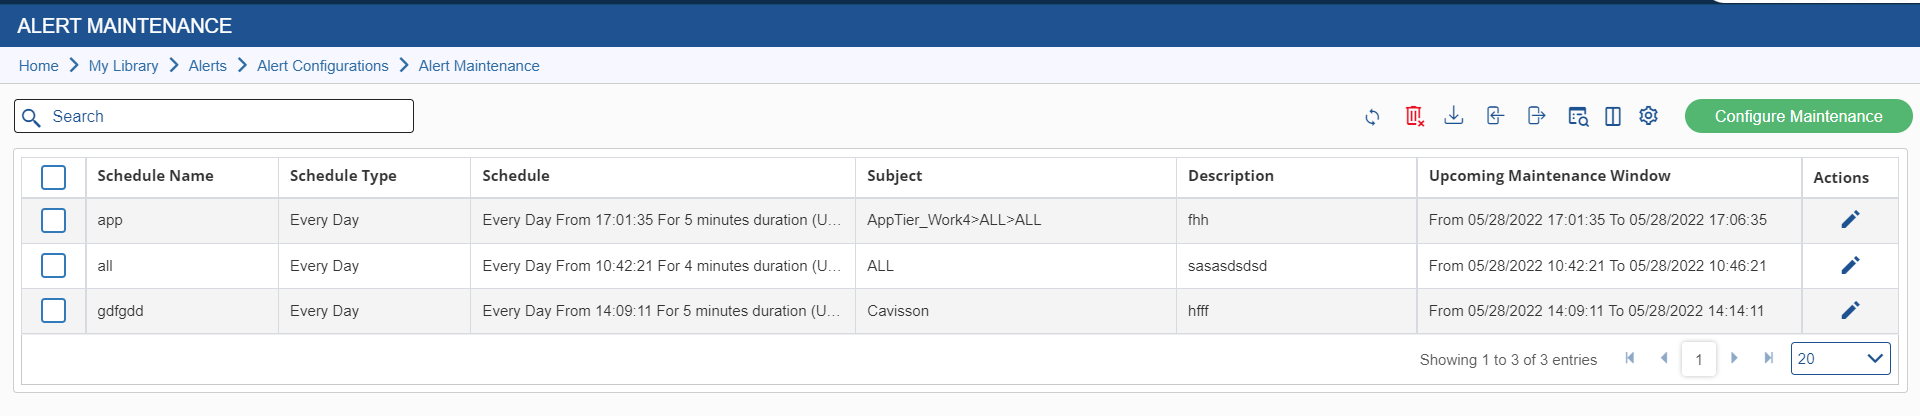
Alert maintenance window configuration is required to disable alert generation at the time of the maintenance period or a scheduled downtime. To view the alert maintenance window, go to the Alert Maintenance option (via the Settings button ) on the Alerts window. Here, you can add a maintenance schedule and can view the applied maintenance schedules. In addition, you can search, edit, import, export, or delete a maintenance schedule based on the requirements.

Figure 27: Alert Maintenance Window

The details in this window include:

  • Schedule Name: In this field, the user has to provide name of the scheduler.
  • Schedule Type: In this field, the user has to provide for how long the scheduler will be configured. For this the user has to set the Preset or Custom
  • Schedule: This field specifies the schedule time duration for the scheduler which is set by the user.
  • Subject: This field specifies the subject level for the scheduler i.e.: All, WebLogic, Cavisson etc.
  • Description: This field consists of the description for the scheduler.
  • Upcoming Maintenance Window: This field is used to specify the upcoming scheduler for maintenance.
  • Actions: This is used for editing an existing scheduler.

Configure Maintenance

You can configure the Alert maintenance On the Alert Maintenance window, click the Configure Maintenance window. This displays the Configure Maintenance Schedule window.

Figure 28: Configure Maintenance Schedule Window

Provide the following details:

  • Schedule Name: Name of the alert maintenance schedule.
  • Subject Level: In this option, there are the following levels which are listed below:
  • The First Index Level is Tier. On selecting ‘All’, a maintenance schedule is applicable for all tiers. On selecting a pattern, specify a pattern for the tier(s) to which the maintenance schedule is to be applied.
  • The Second Index Level is Tier. Rest options are the same as Tier level subjects.
  • The Third Index Level is Tier. Rest options are the same as Tier level subjects.

Note: You can view the further elements of each level of the subject by clicking the Test button. For example, if the user selects a pattern as *Cav at the first subject, and on clicking the Test button, the details are displayed based on the selected pattern.

  • Preset:
  • Every Week: The alert maintenance is triggered at the specified time of the selected day.

Example: From 15:00 to 16:00 each Monday.

  • Every Day: The alert maintenance is triggered at the specified time each day. Example: From 15:00 to 16:00 each day.
  • Every Month: The alert maintenance is triggered on the specified time of either every selected day of the selected week or every selected day of the month.
    • Example – 1: From 15:00 to 16:00 each second Monday of the month.
    • Example – 2: From 15:00 to 16:00 every 15th day of the month.
  • Every Year: The alert maintenance is triggered on the specified time of either every selected day of the selected week of the selected month or every selected day of the selected month.
    • Example – 1: From 15:00 to 16:00 each second Monday of March.
    • Example – 2: From 15:00 to 16:00 every 15th day of March.

Note: For preset time, we have to select the time as per the time zone of the region or as per the requirement.


  • Custom: The alert maintenance is triggered on the specified date and time.

Example: From 3:00 PM 18/05/2021 to 4:00 PM 18/05/2021

  • Description: The description of the maintenance schedule for more insights.